If you’re currently running ads on Facebook or Instagram, you know the wealth of options Facebook Ads Manager provides. You can choose where your ad is shown, specify incredibly detailed (or incredibly broad) target audiences, and create the visual portion of your ad, all in the same place.
But there’s one tool you may not be using yet: Facebook ad scheduling.
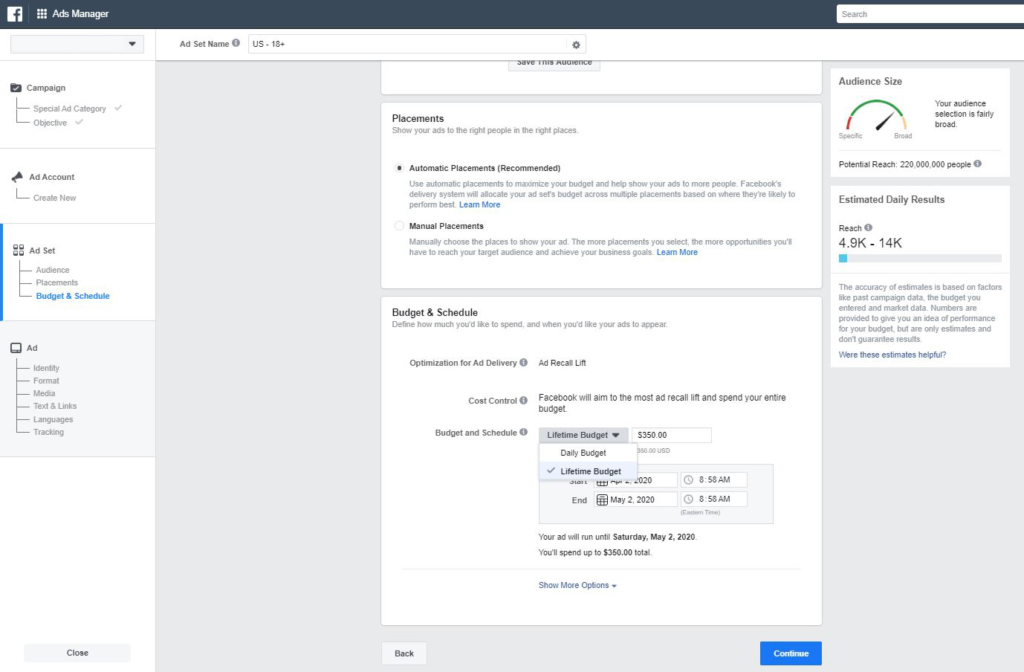
Facebook only allows scheduling of ads with a lifetime budget, so the option is easy to miss if you’ve been setting daily budgets instead.
The scheduling feature is useful for saving time—you can set publish dates for your ads all at once.
It also helps you reach your target audience more efficiently by restricting your ads to time slots when the majority of your audience will be online.
Ready to enjoy these benefits?
In this post, we’ll walk you through how to schedule your ad, and show you best practices for Facebook ad scheduling.
Why Use Facebook Ad Scheduling?
The core value of Facebook ad scheduling is dayparting, or restricting the days and times at which your ad can appear. With dayparting, you can choose to run your ad only on certain days and time slots.
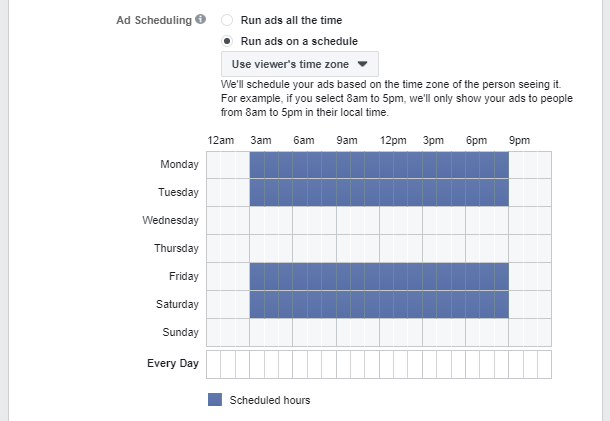
This scheduling is also cost-effective if your audience isn’t active during typically popular hours. The off-peak times when they’re online will typically have lower ad costs. If you schedule your ads for these times, you’ll likely save more money than if you didn’t use a restricted schedule.
How to Schedule Facebook Ads
Facebook ad scheduling is easy to use and takes just a few steps to set up in Ads Manager.
- 1 – Go to your dashboard in Ads Manager and click “create” to start a new ad or ad set.
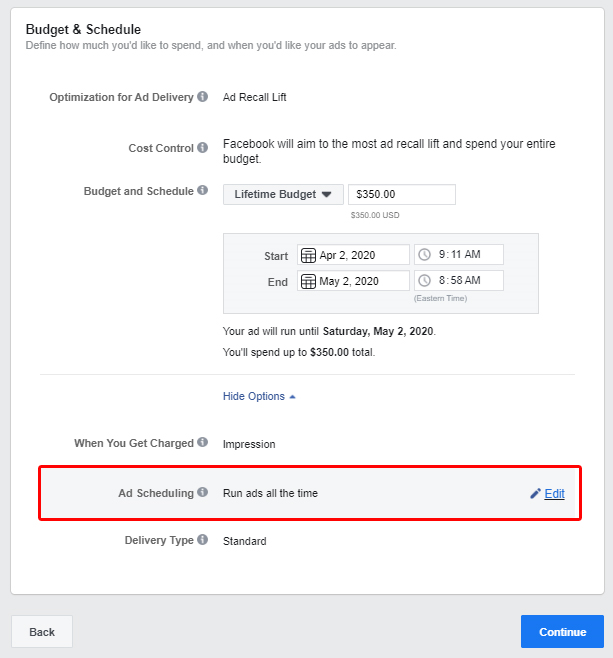
- 2 – Set up the initial parts of your ad as usual. If you’ve never created an ad in Facebook Ads Manager before, check out our complete Facebook Ads Guide for information on setting your objective, placements, and target audience. Once that’s done, you can move on to budget. To use Facebook ad scheduling, you have to set the budget to “lifetime” and specify a total amount you want to spend during the life of the ad.
- 3 – Underneath the budget details, select “Show More Options” and click “Edit” next to “Ad Scheduling.”
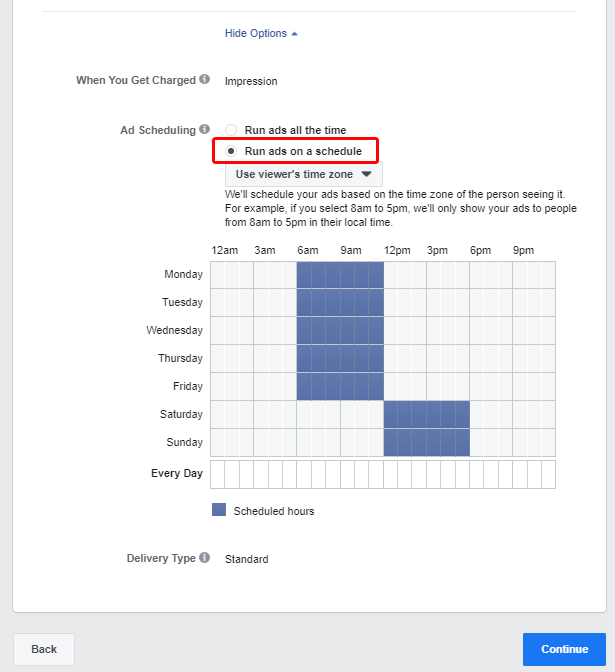
- 4 – Next, select “Run ads on a schedule.” A box with dates and times of day will appear, and you can choose exactly when you want your ad to run. Facebook shows time blocks in one-hour increments. Schedule your ad by day, or choose to run your ad during the same time block every day. For example, if your audience is always on from 10:00 a.m. to 2:00 p.m., you might run your ad only during that time block every day of the week.
- 5 – Once your ad is scheduled, click “Continue,” and complete the rest of the ad creation process. Once you publish the ad, it will run according to the schedule you set.
3 Best Practices for Facebook Ad Scheduling
With such an easy setup, Facebook ad scheduling may seem fairly simple, but there are a few best practices you should follow. These will help you get the most out of your Facebook ad scheduling by helping you determine the best times to run your ad in order to reach your target audience effectively.
1. Schedule Based on Page and Audience Insights
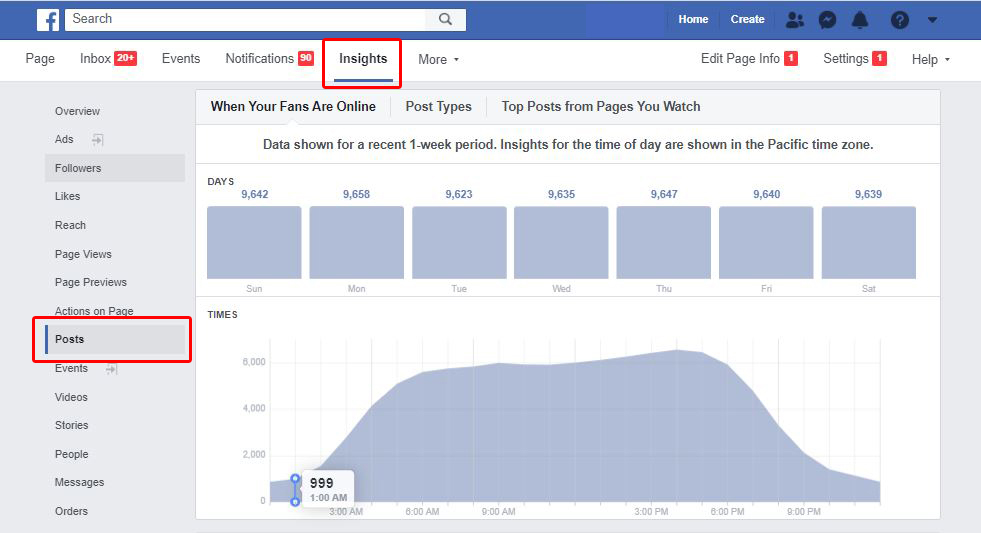
You can’t expect Facebook ad scheduling to work well unless it’s aligned with the routines of your audiences. How do you know when your target customer is most likely to be on the social platform? Insights from your Facebook business page will help determine your audience’s typical schedule.
At the top of your Facebook business page, select “Insights.” Then, choose “Posts” from the left-hand menu, and select the “When Your Fans Are Online” tab. This will show you what days and times your audience is most active.
2. Broaden Your Schedule
Limiting your ad schedule to when your target audience is active is cost-effective and increases reach, but you should be wary of creating a schedule that’s too restrictive. Open up your schedule to multiple potential times when your audience might be online, rather than just scheduling during the one or two peak times during the week.
For example, say your audience is mainly online Monday through Friday from 10:00 a.m. to 1:00 p.m., but they also have a small spike Tuesday through Thursday from 8:00 p.m. to 10:00 p.m. Schedule your ad to run during both of those time slots so your ad has more reach.
Broadening your schedule can also help keep ad costs down if your audience is mainly online during peak hours. Schedule your ads to run during some off-hours as well and you’ll likely reduce per-ad costs and increase the reach of your ad.
3. Monitor and Adjust Scheduling as Needed
No matter who your audience is, their active times are subject to change. To see if your schedule needs to be adjusted, keep track of your ad performance through the “Ads” section of your Ads Manager dashboard. It will show you a series of key metrics, including cost per result; reach; frequency; and amount spent so far.

If page insights don’t give you enough guidance, trial&error works as well. Start by widening your schedule to include an extra hour at either end of your ad’s run time. If your ad performance doesn’t improve, try removing the added hour and adding it at the opposite end of the ad schedule instead.
By using your page insights and continually monitoring your ad’s performance, you will make the most of Facebook ad scheduling and effectively target your desired audience.
Reach Your Target Customer with Facebook Ad Scheduling
Creating an ad for a specific target audience takes work—you have to research your customers, build a segment based on that data, and design the visual element of your ad to appeal to those customers. All of that effort is wasted if your ad is shown when your audience isn’t online.
By tracking your audience’s habits and using Facebook ad scheduling, you can increase the chances that your target audience sees your ad. You’ll also save time with this feature by creating several ad sets at once and setting future publishing dates, rather than having to create each new ad at the time you want to publish it.
Have you used Facebook ad scheduling? Let us know in the comments how it worked for you!

Great information about Facebook ad scheduling. It is nice that you pulled up lot of screenshots from the FB ads manager to explain this ad scheduling concept in a simple way.
Amazing blog! So helpful and unique!